Single Disc Unit has been manufactured to face heavy-duty seeding and fertilizing tasks.
The 18” plain disc at a 7° angle opens a furrow leaving the soil firmly pressed on one side but stirred on the other.
A 4 ½ x 15” leveling wheel determines furrow depth while a cast shoe working jointly with the blade places seed and fertilizer in the furrow through independent downright tubes.
A press wheel guarantees accurate seed placement at the bottom of the furrow for improved emergence.
A cover wheel system covers the furrow.
The Single Disc Seeding Unit is ideal for minimizing trash removal and soil stirring. Highly recommended for clayish, sticky soils and also for salty soils where non-stirring is appreciated.
SEEDING SHOE
 Make sure the down tubes are placed just in between the clearance left by the colter and the seed press device.
Hardfacing on the lower area of the shoe must be very neat so as to ensure good shoe-colter contact.
Check the shoe can swing freely on the fixing bolt.
SEEDING SHOE OPERATION AND SERVICE.
Follow the instructions for proper operation and longer life.
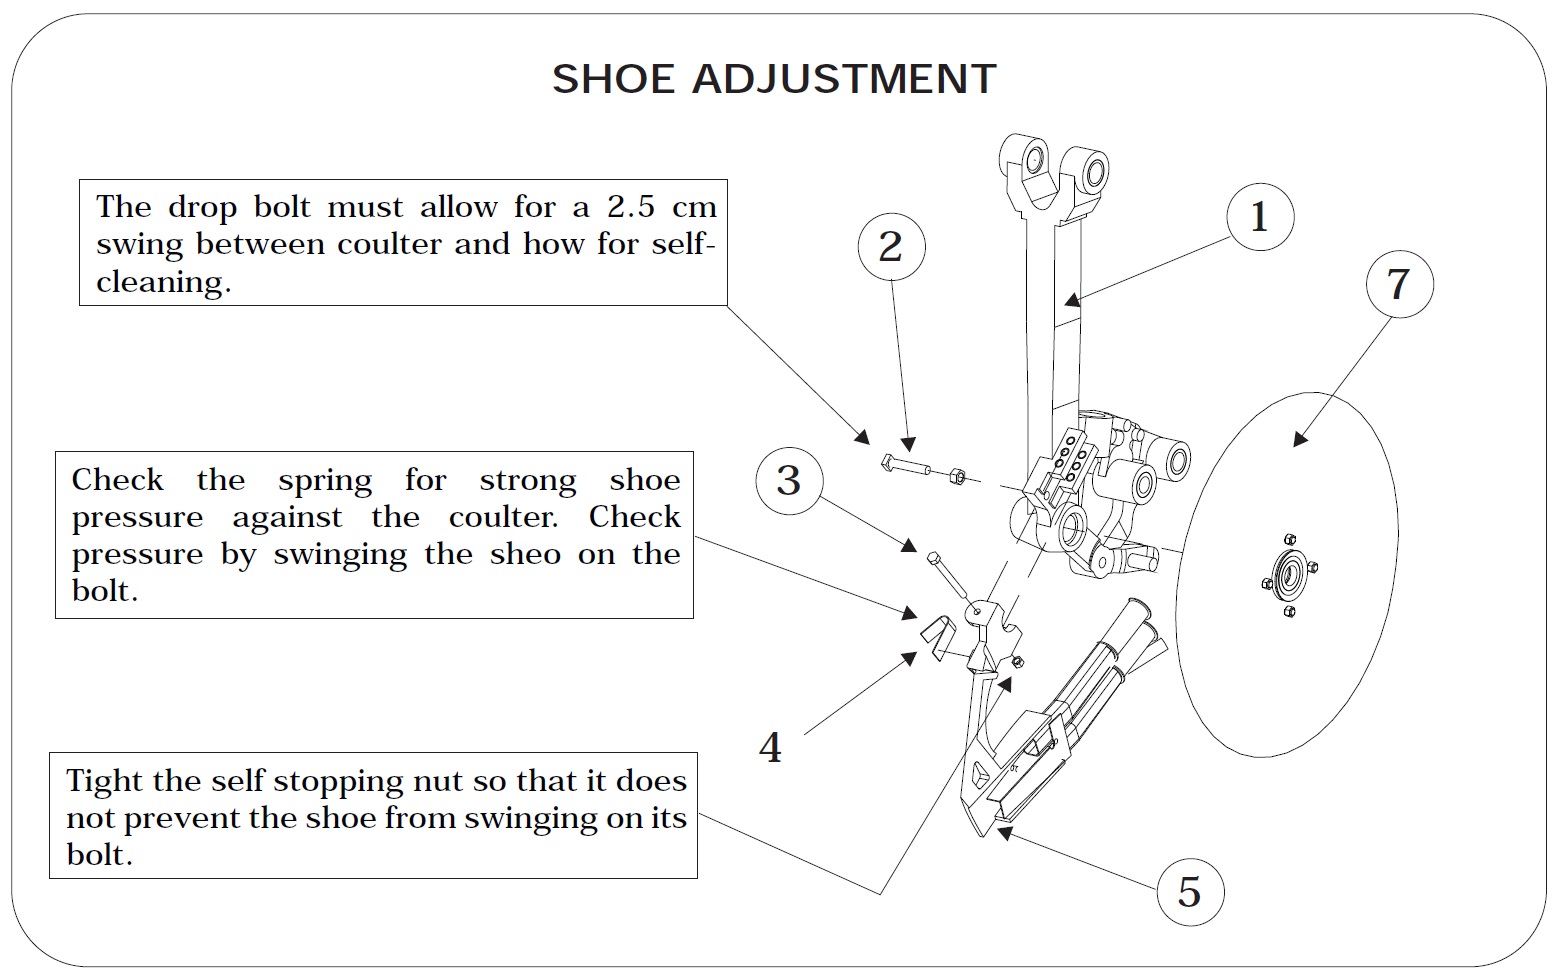
– The shoe (5) must swing freely on the fixing bolt (3). Spring (4) ensures
good contact between the disc blade (7) and shoe (5). Swinging allows for shoe
self-cleaning during seeding. If the soil were too wet, some manual cleaning would be needed.
If there´s no pressure between the shoe and the disc blade, spring(4) will
have to be changed.
– The drop bolt (2) must not cancel the spring (4) action since it would
prevent self-cleaning and maintenance with eventual damage to the system.
– 2.5cm in the lower area should be the minimum clearance between disc and shoe.
– Check there is a constant contact between shoe (5) and disc (7).
If the instructions were ignored the system may be damaged and the following problems may occur:
– Quick and uneven shoe wear (5).
– Quick wear of bolt holes in the main unit (1).
– Quick wear of shoe bolt hole (5).
– Breakage of disc holder hub bolts (7).
– Breakage of shoe bolts (5).

The shoe (5) must be bolted to the main holder fixing holes (A); right bolting position will depend on soil condition and on disc wear.
The shoe can be bolted to the upper hole in order to.
– Compensate colter wear.
– Reduce shoe wear with deep seeding practices.
– Reduce trash storing between shoe and colter.
The shoe can be bolted to the lower hole in order to:
– Seed at 30mm deep or even shallower.
– Seed over heavy trash.
– Use a wear shoe together with a new colter.
– Get even seeding depths when sowing at high speed.
Caution:
Always ensure a minimum of 5-10mm of disc below the seeding shoe otherwise damage may occur to the main arm of the unit. At this point of disc wear, you have the option to move the shoe into the next hole position above or replace the colter disc.-
The drop bolt (2) must let the shoe swing freely (2.5cm) so that a self-cleaning action can take place. If it is too tight against the shoe the spring will not work and the set will wear faster or break as blockage will be produced. An advantage of tight fitting is the possibility of working on damp soils.-
MAIN HOLDER
It is made up by a strong nodular cast reinforced holder which features heat-treated bushings and zerks for a longer component life.


Advantages of proper greasing:
a) Prevents friction between two metallic surfaces
B) Prevents rusting
c) Protects bushings and bearings from dust and dirt
Proper greasing ensures satisfactory performance. Make sure the zerks are not clogged and in good working condition. Change them if necessary.-

DISC HOLDER HUB
32006 PRE-LOAD BUSHING HUB.
ASSEMBLY:
It is assembled with a spacer pre-load bushing and three steel nuts.
The 32006 hub set wears better and ensures more accurate seeding. It
can be re-adjusted when slack appears by taking some of the nuts away.
ADJUSTMENT:
Use a torquemeter at a pressure of 15 kg. Start by rotating the colter
until the torquemeter indicates the adjustment is completed.
SET FINAL CHECK:
Check the colter for free rotation by driving it forward by hand. Make
sure there is no rubbing between shoe and colter or between colter and
tire.
Check the axle and the hub for slack. If no slack is noticed, the spacer is
in the right position.-
 RECOMMENDATIONS
– The seeding unit comes pre-lubricated from the factory, but it is recommended to lubricate the blade holder hub before starting the seeding procedure for the first time.
If the blade holder hub has not enough grease, the conic bearing working life is drastically reduced.
– Do not grease in excess since it may lead to the breakage of the blade holder hub retainers.
– Check that the two conic bearings adjustment is not weak (this is noticeable if the blade produces a lateral backlash when manually moved). This defect can lead to the breakage of the bearing and reduce its working life, and possibly the breakage of the blade.
– Also, the excessive adjustment of the conic bearings can produce too much friction and overheat the hub, causing bearing destruction (the blade should be manually moved, without a lateral backlash).
– Lubricate after the first 10 hectares per seeding unit; for example, if the
seeder has 48 units, lubricate after 480 hectares and check that there is no
bearing backlash. If the bearing produces a backlash, adjust according to the procedure.
– Lubricate again after 25 hectares per seeding unit; for example, if the seeder has 48 units, lubricate after 1200 hectares and check that there is no bearing backlash. If the bearing produces a backlash, adjust according to the procedure.
– After 50 hectares (if the seeder has 48 units, it equals to 2400 hectares),
lubricate and adjust the conic bearing backlash. According to the ground type, the blade change is made at this stage.
– After 75 hectares (if the seeder has 48 units, it equals to 3600 hectares),
lubricate and adjust the conic bearing backlash in case of a lateral backlash of the blade.
– Between 75 and 100 hectares, according to the aggressive level of the
ground, the conic bearings and the retainers should be changed. If the ground is very aggressive, it is recommended to lubricate and check for a lateral backlash of the blade more frequently.
SEED PRESSING DEVICE (K)
It´s a system consisting of an adjustable plastic spring plus two fixing bolts.
It is assembled on the seeding hoe being its main advantage to prevent seed.
Bouncing and/or blockage and to assure superb seed placement at the bottom of the furrow.
LOCKING WHEEL
The Locking Wheel System consists of a cast locking wheel whose function is to tighten the soil and to lock the furrow on the side where the shoe works.
On clayish soils, the wheel has to be placed closer to the seeding line while in the case of sandy soils the wheel has to be placed further.
Washers are used to adjust wheel position which will be determined by the number of washers used.
In this system, the bearings are placed on the arm instead of being placed on the wheel to avoid dirt from coming in.
IMPORTANT:
Don´t use kerosene to wash the bearings as it leaves a layer that
prevents lubricant from sticking to the surfaces and may cause overheating and breakages.
LOCKING WHEEL
Locking Wheel Pressure is adjusted by means of a three-point spring which can be regulated as for ground features.
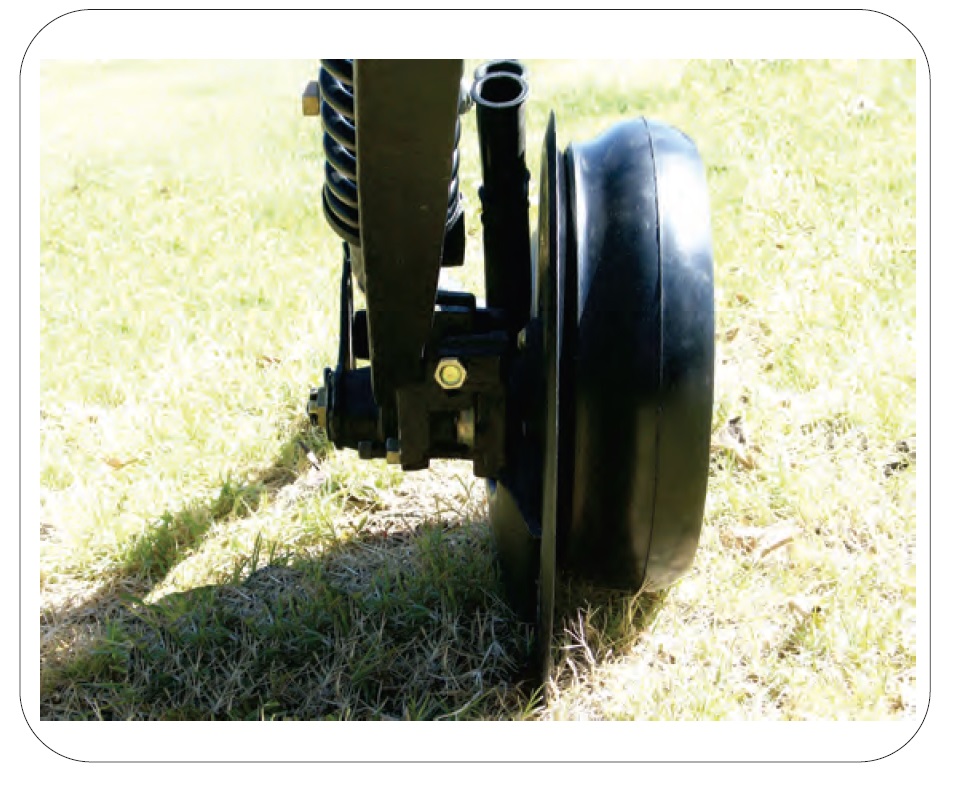
LEVELING WHEEL
The leveling wheel is designed with a wrought hub and double bearings for heavy work.
To increase wheel life under severe working conditions some extra non-ribbed bolts have been added.

The 3mm opening between the lip of the tire and the colter is aimed at
reducing tire wear. It is adjusted by means of steel washers and it allows the wheel to come into slight contact with the disc when the drill is at work.
 A special tool for displacing a punched plaque in one way or the other is used to adjust leveling wheel position.
COMPRESSION SYSTEM
It is made up of a first quality, highly resistant helicoidal spring which can resist heavy loads during the seeding process.
Check the separator tube is well shaped to ensure free circulation through the cast bushing. After changing a consumable, assembly the system carefully and check nut pressure to prevent them from becoming loose and the tube from getting out of shape.

FIELD ADJUSTMENT
FOLLOW THE INSTRUCTIONS FOR PROPER ADJUSTMENT:
Adjust seeding unit thoroughly.
1- Adjust seeding depth.
Reduce pressure on the cover wheels and on the press wheel.
Use the handle to adjust seeding depth on the punched plaque going up or down one hole at a time.
When you get to the desired depth adjust unit spring compression to prevent the wheel from leaving a deep track on the ground or the body from being lifted.
Depth must be checked with the drill traveling at working speed. The seeding unit MUST NEITHER work “over” the ground NOR press it so hard as to leave a deep track.
2- Adjust press wheel pressure until there is good contact between seed- furrow bottom.
3- Adjust cover wheels until getting the desired seed coverage. In order to bring soil into the furrow adjust the wheels and exert torsion on the spring.
Reduced stirring is achieved by assembling the notched devices on the inner side.
Replace them when working on high stalk trash.
4- Adjust the remaining units the same way.
5- Try the drill at seeding speed in order to check general performance.
You may need to adjust the cycle of the cylinder commanding the seeding units.
6-IMPORTANT:
Check that the blade holder hub is properly assembled. A loose blade reduces the bearing working life.
Poor adjustment of the 2 conic bearings won’t allow rotation and will cause the blade to break the bearing.
Excessive adjustment of the 2 conic bearings will cause frictional heating and the bearing working life will be reduced.
Check that the blade holder hub is properly lubricated when starting your work.
(See blade holder hub maintenance).
Avoid seeder turns if the units are not elevated, since it may lead to several breakages.
In grounds with excessive humidity and stubble use the different options of depth controllers wheels (See page 24).
Check the blade wear and the shoe position to avoid breakage. The new main units are equipped with an interchangeable support to adjust the shoe position.
The disc cleaning set can be used for all depth controller wheels options.